JPA入门,Spring Boot 整合 JPA 操作数据库
简单了解
Jpa(java Persistence API,java持久化 api),它定义了对象关系映射(ORM)以及实体对象持久化的标准接口。在 Spring boot中 JPA 是依靠 Hibernate才得以实现对的,Hibernate 在 3.2 版本中对 JPA 的实现有了完全的支持。
Spring Boot 整合 JPA 可使开发者用极简的代码实现对数据的访问和操作。它提供了包括增删改查等在内的常用功能,且易于扩展!
添加依赖
1 | #这里添加 Jpa 和 Mysql 的依赖 |
开发Jpa
编写实体类
定义用户实体类 User
1 | //@Entity 表明这个是一个实体类 |
配置文件说明
Spring Boot 配置文件 application.yml 内容如下
1 | server: |
ddl-auto属性说明
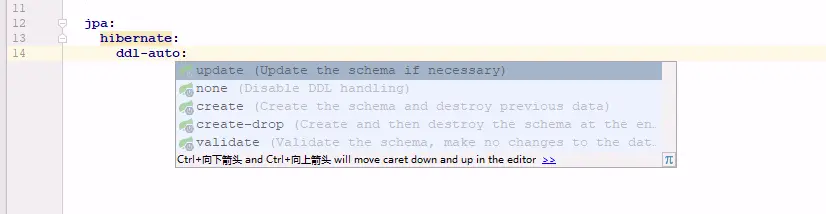
1 | 常用属性: |
这里我们使用 update,让应用启动时自动给我们生成 User 表
基础操作
1、编写 UserRepo 继承 JpaRepository
1 | import me.zhengjie.domain.User; |
2、使用默认方法
在 test 目录中,新建 UserTests
1 |
|
自定义简单查询
自定义的简单查询就是根据方法名来自动生成 SQL,主要的语法是 findXXBy, readAXXBy, queryXXBy, countXXBy, getXXBy 后面跟属性名称:
1 | public interface UserRepo extends JpaRepository<User,Long> { |
具体的关键字,使用方法和生产成 SQL 如下表所示
| Keyword | Sample | JPQL snippet |
|---|---|---|
| And | findByLastnameAndFirstname | … where x.lastname = ?1 and x.firstname = ?2 |
| Or | findByLastnameOrFirstname | … where x.lastname = ?1 or x.firstname = ?2 |
| Is,Equals | findByFirstnameIs,findByFirstnameEquals | … where x.firstname = ?1 |
| Between | findByStartDateBetween | … where x.startDate between ?1 and ?2 |
| LessThan | findByAgeLessThan | … where x.age < ?1 |
| LessThanEqual | findByAgeLessThanEqual | … where x.age ⇐ ?1 |
| GreaterThan | findByAgeGreaterThan | … where x.age > ?1 |
| GreaterThanEqual | findByAgeGreaterThanEqual | … where x.age >= ?1 |
| After | findByStartDateAfter | … where x.startDate > ?1 |
| Before | findByStartDateBefore | … where x.startDate < ?1 |
| IsNull | findByAgeIsNull | … where x.age is null |
| IsNotNull,NotNull | findByAge(Is)NotNull | … where x.age not null |
| Like | findByFirstnameLike | … where x.firstname like ?1 |
| NotLike | findByFirstnameNotLike | … where x.firstname not like ?1 |
| StartingWith | findByFirstnameStartingWith | … where x.firstname like ?1 (parameter bound with appended %) |
| EndingWith | findByFirstnameEndingWith | … where x.firstname like ?1 (parameter bound with prepended %) |
| Containing | findByFirstnameContaining | … where x.firstname like ?1 (parameter bound wrapped in %) |
| OrderBy | findByAgeOrderByLastnameDesc | … where x.age = ?1 order by x.lastname desc |
| Not | findByLastnameNot | … where x.lastname <> ?1 |
| In | findByAgeIn(Collection ages) | … where x.age in ?1 |
| NotIn | findByAgeNotIn(Collection age) | … where x.age not in ?1 |
| TRUE | findByActiveTrue() | … where x.active = true |
| FALSE | findByActiveFalse() | … where x.active = false |
| IgnoreCase | findByFirstnameIgnoreCase | … where UPPER(x.firstame) = UPPER(?1) |
分页查询
1 | Page<User> findALL(Pageable pageable); |
Pageable 是 spring 封装的分页实现类,使用的时候需要传入页数、每页条数和排序规则
1 |
|
限制查询
有时候我们只需要查询前N个元素
1 | /** |
自定义SQL
如果项目中由于某些原因 Jpa 自带的已经满足不了我们的需求了,这个时候我们就可以自定义的 SQL 来查询,只需要在 SQL 的查询方法上面使用@Query注解,如涉及到删除和修改在需要加上 @Modifying
1 | /** |
本文主要讲解了 Jpa 的一些简单的操作,下篇文章将讲解 Jpa 如何使用 Specification 实现复杂的查询,如多表查询,模糊查询,日期的查询等
本博客所有文章除特别声明外,均采用 CC BY-NC-SA 4.0 许可协议。转载请注明来源 知了小站!
 微信
微信 支付宝
支付宝
相关推荐

2023-05-12
Jpa 持久层中使用自定义对象接收数据
在 JPA 持久层中,可以自定义接收数据的对象。这通常用于查询操作,其中查询结果不完全匹配现有的实体类,或者需要仅返回某些字段的结果。以下示例,展示如何在 JPA 持久层中自定义接收数据的对象 假设有一个名为 Person 的实体类,包含 id、name 和 age 字段: 1234567891011121314@Entity@Table(name = "person")public class Person { @Id @GeneratedValue(strategy = GenerationType.IDENTITY) private Long id; private String name; private int age; // 省略构造函数、getter 和 setter 方法} 现在我们只想查询人员的姓名和年龄,并将结果封装到自定义的数据对象 PersonInfo 中: 12345678public class PersonInfo { pri...

2022-06-08
Jpa进阶,使用 Specification 进行高级查询
前言上一篇文章主要讲了 Jpa 的简单使用,而在实际项目中并不能满足我们的需求。如对多张表的关联查询,以及查询时需要的各种条件,这个时候你可以使用自定义 SQL 语句,但是Jpa并不希望我们这么做,于是就有了一个扩展:使用 Specification 进行查询 修改相应代码1、修改 User.class代码用的上一篇文章的,这里在 User 类中进行扩展,待会查询时会用到 123456789101112131415161718192021222324252627@Entity@Table(name = "user")public class User { //部分代码略 /** * 加上该注解,在保存该实体时,Jpa将为我们自动设置上创建时间 */ @CreationTimestamp private Timestamp createTime; /** * 加上该注解,在保存或者修改该实体时,Jpa将为我们自动创建时间或更新日期 */ @UpdateTimestamp pr...

2019-10-17
Spring boot 整合 FreeMarker 实现代码生成功能
在我们开发一个新的功能的时候,会根据表创建Entity,Controller,Service,Repository等代码,其中很多步骤都是重复的,并且特别繁琐。这个时候就需要一个代码生成器帮助我们解决这个问题从而提高工作效率,让我们更致力于业务逻辑。 设计原理在我们安装数据库后会有几个默认的数据库,其中information_schema这个数据库中保存了MySQL服务器所有数据库的信息,如:数据库名、数据库表、表的数据信息与访问权限等。 12information_schema的表tables记录了所有数据库的表的信息information_schema的表columns记录了所有数据库的表字段详细的信息 我们代码中可以可以通过Sql语句查询出当前数据库中所有表的信息,这里已 eladmin 为例。 123# 显示部分数据:表名称、数据库引擎、编码、表备注、创建时间select table_name ,create_time , engine, table_collation, table_comment from information_schema.tables whe...

2021-02-13
@Autowire 和 @Resource 注解的区别与使用的正确姿势
今天使用Idea写代码的时候,看到之前的项目中显示有warning的提示,去看了下,是如下代码? 12@Autowireprivate JdbcTemplate jdbcTemplate; 提示的警告信息 12345Field injection is not recommended Inspection info: Spring Team recommends: "Always use constructor based dependency injection in your beans. Always use assertions for mandatory dependencies".这段是Spring工作组的建议,大致翻译一下:属性字段注入的方式不推荐,检查到的问题是:Spring团队建议:"始终在bean中使用基于构造函数的依赖项注入,始终对强制性依赖项使用断言 如图:Field注入警告 注入方式虽然当前有关Spring Framework(5.0.3)的文档仅定义了两种主要的注入类型,但实际上有三种: 基于构造函数的依赖注入123...
2019-10-25
Java 8:一文掌握 Lambda 表达式
本文将介绍 Java 8 新增的 Lambda 表达式,包括 Lambda 表达式的常见用法以及方法引用的用法,并对 Lambda 表达式的原理进行分析,最后对 Lambda 表达式的优缺点进行一个总结。 1. 概述Java 8 引入的 Lambda 表达式的主要作用就是简化部分匿名内部类的写法。 能够使用 Lambda 表达式的一个重要依据是必须有相应的函数接口。所谓函数接口,是指内部有且仅有一个抽象方法的接口。 Lambda 表达式的另一个依据是类型推断机制。在上下文信息足够的情况下,编译器可以推断出参数表的类型,而不需要显式指名。 2. 常见用法2.1 无参函数的简写无参函数就是没有参数的函数,例如 Runnable 接口的 run() 方法,其定义如下: 1234@FunctionalInterfacepublic interface Runnable { public abstract void run();} 在 Java 7 及之前版本,我们一般可以这样使用: 1234567new Thread(new Runnable() {...

2022-12-01
Java 开发之 BigDecimal 用法细节详解
一、BigDecimal 概述 Java 在 java.math 包中提供的 API 类 BigDecimal,用来对超过 16 位有效位的数进行精确的运算。双精度浮点型变量 double 可以处理 16 位有效数,但在实际应用中,可能需要对更大或者更小的数进行运算和处理。一般情况下,对于那些不需要准确计算精度的数字,我们可以直接使用 Float 和 Double 处理,但是 Double.valueOf(String) 和 Float.valueOf(String) 会丢失精度。所以开发中,如果我们需要精确计算的结果,则必须使用 BigDecimal 类来操作。 BigDecimal所创建的是对象,故我们不能使用传统的 +、-、*、/ 等算术运算符直接对其对象进行数学运算,而必须调用其相对应的方法。方法中的参数也必须是 BigDecimal 的对象。构造器是类的特殊方法,专门用来创建对象,特别是带有参数的对象。 二、BigDecimal 常用构造函数2.1、常用构造函数1234567891011// 创建一个具有参数所指定整数值的对象BigDecimal(int)// 创建...
评论


